This page illustrates step-by-step how to hack some types of tile maps out of tile-based games. The game we will be using is Super Mario World® running on ZSNES, though the same tricks apply to most tile-based games on most emulators.
Step 1: Load the Game
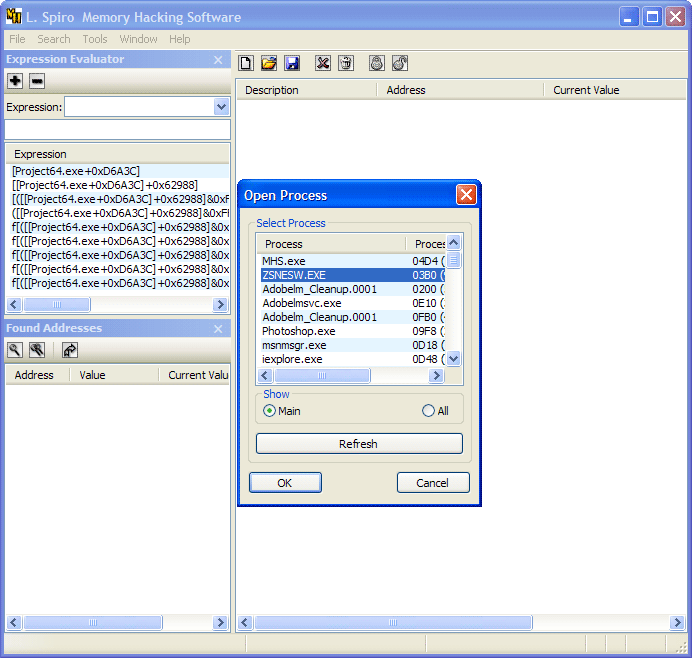
A wise starting place would be to actually attach to the emulator of your choice. The choice of the tutorial is ZSNES. Go to File/Open Process and select your emulator from the list.
Naturally, you must also load the game of your choice into the emulator. No instructions are provided for doing that.
Step 2: Finding a Good Tile Map
We will use the USD Search to find the tile map. The USD pattern filters junk more easily if it is longer and more unique. The USD pattern is based off the tile pattern in the game, so we need to find a tile pattern in the game that is unique and long.
The tile map to the left is long, but not very unique. We can expect to find many numbers in the game that repeat. The pattern to the right, however, is much more unique.
Here we are assuming the tile map runs from left to right, but it may happen that the tiles actually run from the top to the bottom. Either way will work the same, however. But when you compose a USD string, you will follow the tiles downwards instead of to the right, as we will in our example.
Step 3: Create the USD String
Certainly the easiest of the steps. Go to Search/Group Search in MHS. Select USD Search in the Evaluation Type. Most tile maps are stored as single bytes. Set Treat Elements in List as to 1 Byte. Also select a suitable range to reduce the number of junk returns we get. Opening the Hex Editor (and selecting the Info tab) we can see that ZSNES.exe starts at 0x00400000 and ends at 0x008E2000. Set our range accordingly. Note that this is not the correct way to calculate ranges on larger games that allocate the game heap dynamically. However, in ZSNES and other low-end emulators, the ROMs are stored in a static heap declared within the .EXE module itself, so we can snap our search range to that.
When the dialog matches the picture, you are ready to create the USD pattern to match the tile pattern. Be sure not to select Search Every 4 Bytes, as the pattern we are trying to find could be on any byte.
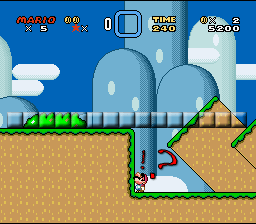
To create the USD string, look at the tile pattern in the game. Notice how the tiles relate to each other in terms of Unknown, Same, and Different. The first tile is always Unknown; we don’t know its value and we don’t know how it relates to the tile in front of it because it is the first tile already. If the following tile is the same, it is Same. If the following tile is different, it is Different. Look at the game.
The tiles are lettered based off how they relate to the previous tile. Obviously the background is on another layer and is not counted.
The first tile is always Unknown. The next tile is Different. So is the next. But the next tile is the Same, followed by a Different.
In this example, the string we get is UDDSDDSSSSSDDDD. Quite a good pattern! Enter this into Values to Find and press OK.
Step 4: Identify the Target
We got 18 returns! A low number that makes it possible to eliminate junk by hand. If you got a large number of results, you will need to try to find a better tile-map pattern and search again. If you got no returns or no good returns, the tile map might be stored differently from what you expect. Maybe 4 bits. Maybe top-to-bottom. Try various searches until you get something good.
We can easily
eliminate
most of them instantly. Look at the first return: 64 248 0 0 248- STOP. Is the 5th tile the same as the second tile? No, so this is not the tile map.
We know that the first tile is the same as all the ones in the middle that repeat. For example, in the second return, the middle is filled with 171’s. The first value, however, is 199, so this is not the match. We can eliminate all the ones that begin with 199 this way.
We are already half way down the list. When you have eliminated all that you can you will find that there is only 1 on this list that could be our match: 006BA589, 4th from the bottom.
First, add this address to the main list by double-clicking it. Feel free to name it. Now right-click it in either list and select View in Hex Editor.
We need to test to ensure that this is really our target. Once the Hex Editor is open you should see more of the data.
The data looks normal. Let’s mess it up to see if it changes our game.
There are many ways to do this. One method is to select some of the data and simply hit Del to set the selected bytes to 0. Let’s look at something a bit fancier because it has many uses, once you are familiar with it.
We searched for 15 tiles, so select 15 tiles from the start (addresses 006BA589 to 006BA597). Select the Tools/Operations/Assign menu item. Enter the following:
Treat Data As: Byte (because our tiles are 1 byte in size). Operand: 0 Decimal Operand Step: 1 Skip Bytes: 0
Press OK.
The values have been changed from 00 to 0E (15). This is a great feature useful in many situations.
Now that we changed the data, we need to go back to the game and check the results.
Going back to Super Mario World® we see no changes to the ground. Did we miss our target? Wait! The Super Nintendo Entertainment System®, as well as other low-end game machines, buffers layers into VRAM (graphics RAM) for quick drawing. Even if we change the tile map, we won’t see anything change until we cause the VRAM to be flushed.
How do we do this? Luckily it is extremely easy. The VRAM banks on old machines are capable of holding only 4 screens (2 in each direction) at a time. So simply by moving away from this area by at least one full screen we can cause the VRAM to flush this area.
Coming back we see the changes we made.
We are inside the tile map. But not at the beginning. It is useful to know this is the tile-map location, but where does the tile map actually begin?
The start of a tile map can be difficult to find. First, estimate how far into the tile map you are. In our example, we aren’t far. Scroll back in the Hex Editor looking for odd changes in the data patterns. If you scroll over a long range and feel you aren’t that far inside the tile map, you may have missed the start.
Finding the start is most often just a matter of good eyes and spotting sudden changes in the pattern. If you know how the pattern should be near the start, it can help to spot that too.
You can also walk backwards towards the start of the tile map and change data as you go, just as we did above. Scroll back, change some data, then look for your changes to see how far back you’ve gone.
Be creative; there is no single way to find the start.

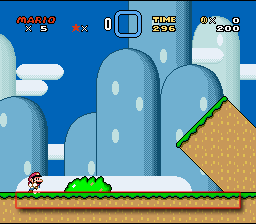
 The tile map to the left is long, but not very unique. We can expect to find many numbers in the game that repeat. The pattern to the right, however, is much more unique.
 When the dialog matches the picture, you are ready to create the USD pattern to match the tile pattern. Be sure not to select Search Every 4 Bytes, as the pattern we are trying to find could be on any byte.
 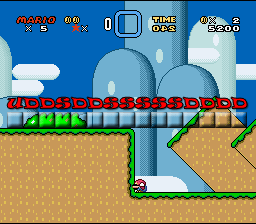 The tiles are lettered based off how they relate to the previous tile. Obviously the background is on another layer and is not counted.
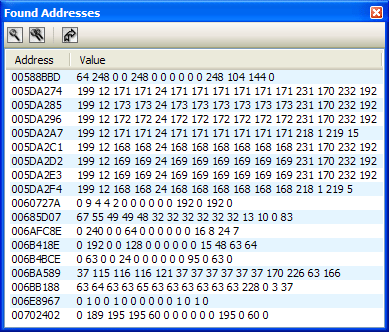 We got 18 returns! A low number that makes it possible to eliminate junk by hand. If you got a large number of results, you will need to try to find a better tile-map pattern and search again. If you got no returns or no good returns, the tile map might be stored differently from what you expect. Maybe 4 bits. Maybe top-to-bottom. Try various searches until you get something good.
 The values have been changed from 00 to 0E (15). This is a great feature useful in many situations.
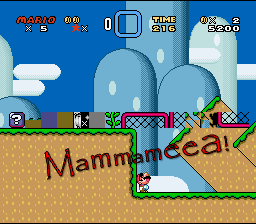 Coming back we see the changes we made.