The Injection Manager allows you to manage injections you have created or imported. MHS uses its own ASM parser. Certain improvements over the OllyDbg parser include speed, stability, and automatic hex-format detection on pure-hex numerics. For example, MOV EAX, [ESI+C] will error in OllyDbg’s parser because “C” is recognized as an identifier (because it begins with an alpha character). This is no problem in the MHS parser, which realizes that it should be treated as a hex value rather than as an identifier.
Terminology
The following table explains the important terminology used in code injections.
Term
Meaning
Flow of Control
The order in which the target process executes instructions. Also called flow of execution.
Original Code
The original code inside the target process that has not been altered.
Control Address
The address where flow of control leaves the target process’ original code and goes to the users’ custom code. This address will be overwritten with a JMP instruction, causing execution to go to the custom code written by the user (at the user’s code cave). This is sometimes called the Main Address.
MHS adds this JMP to the code cave automatically.
Injection
ASM-type code written by the user which has been injected into the executable space of the target process. Once injected, the code will be executed by the target process, and allows the user to have control over the flow of execution.
Injections are commonly used to save pointers to dynamic locations at a static location that can be accessed at any time.
Code Cave
An empty area in the target process that isn’t used by the target process. Injections are placed into these.
MHS can create or find a code cave for you. Or you can specify one manually.
Overwritten
A JMP is written at the control address which causes the previous instructions there to be overwritten. These instructions must then be moved into the code cave where the user’s code is so they can still be executed.
MHS will move the overwritten bytes to your code cave for you, either at the start or end of your code cave.
Return
The JMP from the code cave back to the original code. This is required to resume normal execution by the target process.
The JMP back to the original code must go to the next valid instruction after the JMP in the control address. For example, if the JMP at the control address overwrites 2 instructions, which combined are 7 bytes, and the JMP itself only uses 5 bytes, then there are 2 meaningless bytes after the JMP. The returnJMP should skip these two bytes and jump to the location 7 bytes after the control address, because that is where control would have been if the 2 instructions did not get overwritten.
MHS will add the returnJMP back to the original code for you.
Creating an Injection
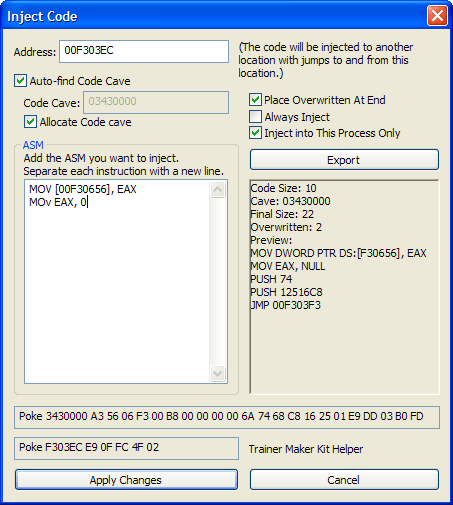
Injections can be created in the Disassembler. Open the Disassembler using the Tool/Disassembler menu item, then right-click in the disassembled address where you want your injection to be placed and select Inject Code. You will see the following dialog.
Here you can create an injection.
The preview window allows you to see the result of the injection before you inject, to allow you to ensure it does what you want it to do.
Near the bottom there are two Poke lines which can be copied and pasted into Trainer Maker Kit. The first is the code for the code cave and the second is the code for the control address to jump to the code cave.
Injections are automatically saved and you can organize your injections in the Injection Manager.
The following chart explains each option.
Option
Meaning
Address
The address where control leaves the target-process code and goes to your injected code. See Control Address above.
Auto-find Code Cave
Allows MHS to find or create a code cave for you.
Code Cave
Allows you to define a specific code cave rather than allowing MHS to find or create a code cave for you.
Allocate Code Cave
Allows MHS to create a code cave for you.
ASM
Add the lines of ASM you want to inject. Lines are not case-sensitive and you may add as many lines as you please. Add new lines by hitting Ctrl-Enter.
Place Overwritten At End
If selected, the overwritten instructions are placed at the end of the code cave. Otherwise they are placed at the beginning.
Always Inject
If checked, the Injection will be automatically injected when the module is detected in the target process. This happens when MHS opens a t process, either by attaching to it normally or by loading it in debug mode.
Inject into This Process Only
Adds a restriction on the above rule. If set to Always Inject, it will abort the injection if the target process is not the same. That is, you could inject into USER32.DLL, which is shared by many processes. This option will prevent the injection from being injected into every USER32.DLL in every process you load into MHS. Instead, it will only be injected into USER32.DLL if the target process is the same as it was when you wrote the injection.
Export
Allows you to save the injection to a file to share with others. The injection does not need to be injected to export, but it does need to be a valid injection.
When you export an injection, you can pack it into an existing injection file. When asked to save the injection, select an existing .inje file. You will be prompted to either add to the file or to save over it.
Managing Your Injections
To open the Injection Manager, select the Tools/Injection Manager menu item.
All injections are shown here. To modify an injection it must not be applied. Press Unapply to unapply an injection for modification.
To remove an injection, select it and press Remove. Removing injections does not cause them to be unapplied; you must unapply manually if you want the injection to be removed from the target process.
Injections are always fully verified before being injected, so there are never undesirable results from automatic injection. For an automatic injection to be successful, the original code at the control address must be exactly the same as it was when the injection was created and the bytes at the code cave must also match how they were when the injection was created, unless the injection is set to create a code cave.
Errors
The following chart explains the meanings of the various error messages related to injections.
Error
Meaning
Invalid code-cave address.
The address for the code cave is not valid.
Invalid target address.
The control address is not valid.
Invalid target address—unable to NOP overwritten instructions.
NOP’ing the overwritten bytes at the control address failed. This is only possible if the control address is within 16 bytes of an unwritable chunk boundary.
Invalid target address—unable to create the JMP to the code cave.
Writing the JMP at the control address failed. This is only possible if the control address is within 16 bytes of an unwritable chunk boundary.
Not set for injection into this process.
Not fatal. It simply means the user opted not to have this injection be automatically injected into every process with the target module.
Unable to access initial JMP point ([Address]).
Verification for automatic injection failed because the memory at the control address could not be read.
Initial JMP point ([Address]) code has changed.
Verification for automatic injection has detected that the code at the control address is no longer the same as it was when the injection was created.
Unable to access initial code cave location ([Address]).
Verification for automatic injection failed because the memory at the code cave address could not be read.
Initial code in the code cave ([Address]) has changed.
Verification for automatic injection has detected that the bytes at the code cave address are no longer the same as they were when the injection was created.
Unable to allocate a code cave.
Allocation for a code cave failed. Applies only to injections set to have code caves created.
Unable to recompile the code at the allocated location.
For any reason, the injection could not be recompiled at the code cave location. The most common cause for this is specifying SHORT jumps—if the code cave is created at a new location later, the jump may need to be LONG.

 Here you can create an injection.
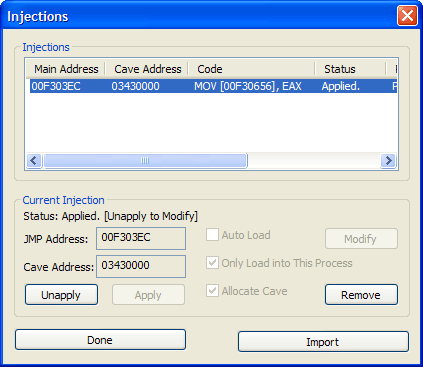 All injections are shown here. To modify an injection it must not be applied. Press Unapply to unapply an injection for modification.